I Vibecoded My First Fri3d Camp 2026 Badge App — And You Can Too
I have written code before. Once upon a time I was even trained as a software developer, though I never ended up using that skill professionally. I do still write code and firmware now and then. But it takes time — and honestly I’d never have justified spending much of it on a simple badge app. So when the new Fri3d Camp 2026 badge landed in my hands, I figured the really cool apps would have to come from someone with more time to spare.
I was wrong. With a bit of AI-assisted coding — “vibecoding” — I went from “wouldn’t it be nice if…” to a finished, published app in an afternoon, with a fraction of the time it would once have taken. This post is the path I took, step by step, so you can do the same with your badge.
The badge you’re already holding#
First, the good news: the 2026 badge is a genuinely capable little computer. Under the screen there’s an ESP32-S3 with Wi-Fi and Bluetooth, a colour display, buttons, an analogue joystick, an IMU (accelerometer/gyro), five addressable LEDs, a battery, a microSD slot, and — on some badges — a LoRa radio. It’s far more than a conference name tag.
The really important part, though, is the software. The badge doesn’t run bare MicroPython; it runs MicroPythonOS — an Android-inspired operating system built by Tom Boontjes . That means:
- Apps are little folders dropped into
/apps/, and they show up in a launcher menu on the screen — just like apps on your phone. - You install apps over the air from BadgeHub, the badge’s community app store. No firmware flashing needed to add an app.
So “writing an app” doesn’t mean hacking the firmware. It means making a folder with a few files and copying it over USB. That’s the bar.
Step 1 — Find something to build#
Before any code: pick an idea. The community keeps a Badge Ideas Spreadsheet — browse it, grab one that sounds fun, or add your own.
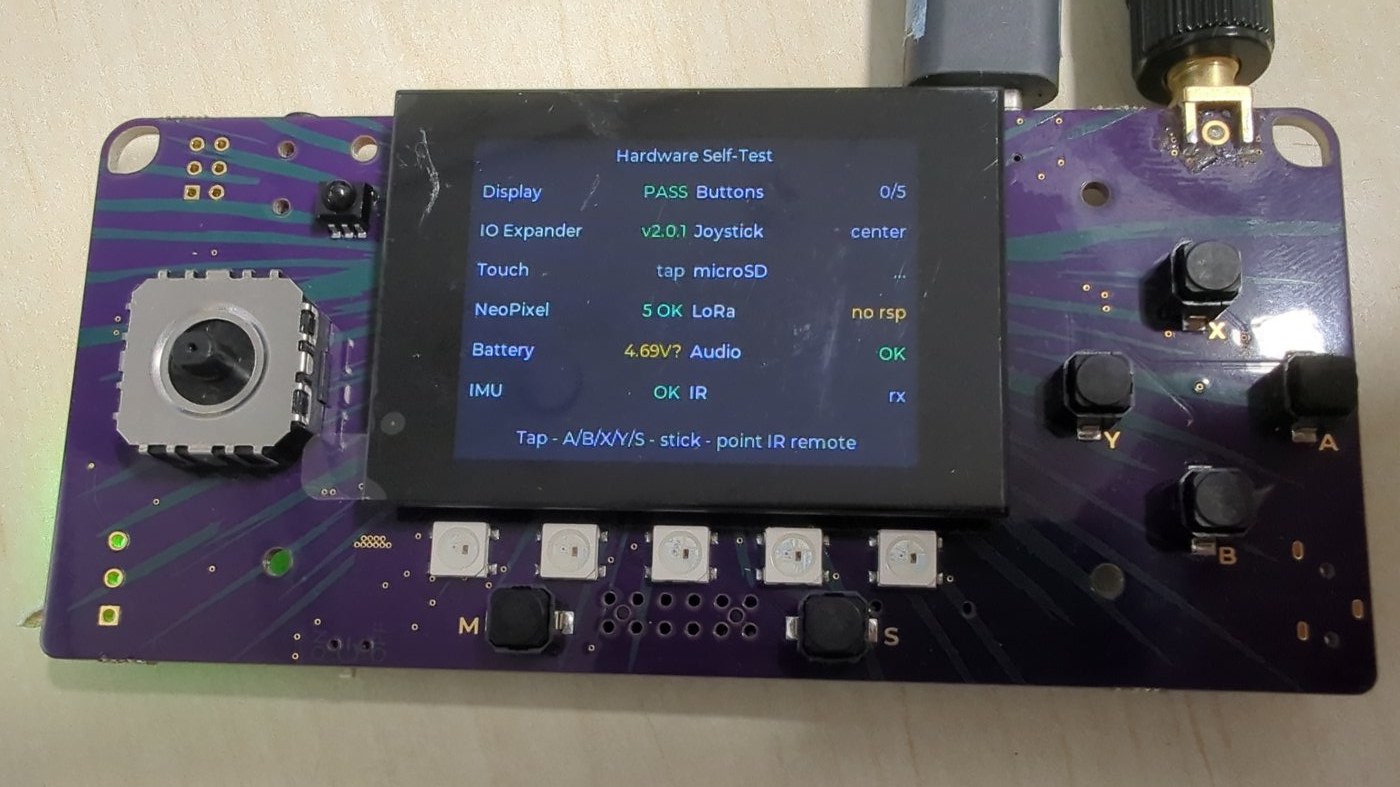
I went with a hardware self-test: a single screen that checks whether every part of the badge works and shows PASS / WARN / FAIL for each one. It was a great first project because it touches a bit of everything (screen, buttons, sensors, LEDs), and it’s actually useful — when you hand a badge to a friend you can confirm it’s all alive.
Step 2 — Gather your tools#
You need three things:
- A USB-C data cable (the one in the box works) to connect the badge to your computer.
mpremote— the official tool to copy files to the badge and run code on it:On Linux, make sure your user is in thepip install mpremotedialoutgroup so you can talk to the serial port withoutsudo. The badge shows up as an Espressif serial device (something like/dev/ttyACM0).- The Fri3d Badge MCP server — and this is the secret weapon. It’s a little bridge (DrSkunk/fri3d-badge-mcp ) that lets your AI assistant actually read the badge documentation and the MicroPython docs while you code. You point Claude (or Cursor, or VS Code Copilot) at it, and suddenly the AI isn’t guessing about the hardware — it knows the pinout, the API, the gotchas. This is what makes vibecoding the badge actually work.
Step 3 — Understand how an app is put together#
A MicroPythonOS app is just a folder with three things in it:
com.you.yourapp/
├── MANIFEST.JSON      # name, version, and a "launcher" entry
├── icon_64x64.png     # the icon in the menu
└── yourapp.py         # your code
The MANIFEST.JSON is just metadata — and the launcher intent filter inside
it is the line that makes your app show up in the menu:
{
  "name": "HW Test",
  "fullname": "org.fri3d.hwtest",
  "version": "0.4.0",
  "activities": [
    { "entrypoint": "hwtest.py", "classname": "HwTest",
      "intent_filters": [{ "action": "main", "category": "launcher" }] }
  ]
}
The Python file holds an Activity class whose onCreate() builds the
screen. Drop the folder into /apps/, tell the system to rescan, and your
icon appears. That’s the whole mechanism.
You don’t need to memorise any of this — your AI, with the MCP docs loaded, will scaffold it for you. But it helps to know the shape.
Step 4 — Vibecoding the app#
Here’s where it gets fun — and where the AI does the heavy lifting.
I described what I wanted to Claude in plain language:
“A single screen that shows PASS, WARN or FAIL for every bit of hardware on the badge, and lets me test the buttons and joystick by pressing them.”
Claude wrote the first version: a tidy grid of rows, each one a hardware check, colour-coded green / yellow / red. Then we iterated. I’d ask for a thing, it would write it, I’d try it.
A single check ends up being just a few lines. Here’s the battery one, plus the line that lights an LED — straight out of the finished app:
import mpos
bm = mpos.BatteryManager()
volts = bm.read_battery_voltage()        # ~4.2 V on a charged badge
mpos.lights.set_led(0, 0, 255, 0)        # LED 0 green
mpos.lights.write() # the lights API is buffered — push it!- The checks themselves. With the MCP server’s docs, Claude knew the
mposSDK —BatteryManagerfor the battery, the IO-expander co-processor for the buttons,lightsfor the NeoPixels, the IMU, the LoRa radio. It wired each one up without me knowing a single register address. - A startup splash with my name and the Makerspace Baasrode logo, because why not.

- Nice touches I asked for along the way: each button lights up its own LED when you press it, the SD card is detected live as you push it in and pull it out, an IR remote makes the IR check go green.
I’ll be honest — it wasn’t all smooth. I’d test on the real badge, something wouldn’t behave, and we’d dig in together. The LoRa check kept erroring until we learned the radio needs a proper wake-up call. I managed to lock the badge up a couple of times discovering that the SD card and the screen share a bus and don’t appreciate being shouted at simultaneously. But every time, the combination of Claude + the MCP docs + the live badge on my desk got us unstuck. That’s the loop, and it’s a good one:
describe what you want → AI writes it → try it on the real hardware → see what actually happens → adjust.
You don’t need to know the API or the pinout. Describe the what; let the AI handle the how; keep the badge honest.
Step 5 — Test on the actual badge#
This part is important, and deeply satisfying. Every change, you copy over and see immediately on the screen in your hand:
# copy the app folder onto the badge
mpremote connect /dev/ttyACM0 cp -r com.you.yourapp/ :/apps/
# tell the OS to rescan /apps, then launch it
mpremote connect /dev/ttyACM0 exec "from mpos import AppManager; AppManager.refresh_apps()"
mpremote connect /dev/ttyACM0 exec "from mpos import AppManager; AppManager.start_app('com.you.yourapp')"
Tap the screen, mash the buttons, wiggle the joystick. If something’s off, you know in five seconds. The badge is the world’s fastest feedback loop.
Step 6 — Package it and publish to BadgeHub#
Once it works, share it. You bundle the app into an .mpk package —
really just a zip with one strict rule: the top-level folder inside it must be
named exactly like your app. Add a small metadata.json (name, description,
category, and the badge identifier mpos_api_0), then upload it on
badgehub.eu
.
A couple of clicks later it’s in the store. Other campers can now find it in their badge’s AppStore and install it over Wi-Fi — no cable, no flashing. My self-test app is up there right now.
Over to you#
Grab your badge. Install the MCP server. Pick an idea from the spreadsheet . Then just start describing what you want to your AI — in your own words, the way you’d explain it to a friend. The badge will meet you halfway.
I can’t wait to see what the rest of you come up with. And if you want to peek at mine, the source is on GitHub and the app is on BadgeHub.
— David, Makerspace Baasrode
Resources#
- Fri3d Camp 2026 badge documentation — start here
- MicroPythonOS documentation — the OS your badge runs
- BadgeHub documentation — how to publish
- MicroPythonOS/MicroPythonOS — the OS + app SDK source (by Tom Boontjes)
- Fri3d Badge MCP server — the AI docs bridge (do this one)
- Badge Ideas Spreadsheet — find your idea
- mpremote — copy code to the badge
- My app on GitHub — a worked example