Bringing a Second-Hand Solar-Log 500 Online

I have a Platinum 3100S inverter on the roof turning sunlight into electricity, and for the longest time the only way I knew what it was doing was the little LCD on the front — if I happened to be standing in front of it. Everything else in the house reports into Home Assistant : the battery inverters, the smart meter, the consumption per circuit. The one thing missing was the source of it all — how much the panels were actually producing. I wanted that number in the Energy Dashboard next to everything else.
The Platinum 3100S has no Ethernet and no friendly API. It does have an RS485 serial bus, and the clean way to read that bus into a network is a dedicated data logger. So I picked up a second-hand Solar-Log 500 — a device purpose-built to talk to inverters over RS485 and expose the data over your LAN. It’s an older unit, but for a single inverter it’s more than enough, and second-hand they’re cheap.
What I expected to be a “plug it in, configure, done” afternoon turned into a proper little detective story. Three things fought me: the device was effectively invisible on my network, the RS485 wiring has a polarity trap, and the firmware was too old to recognise my inverter at all. Here’s how it all shook out.
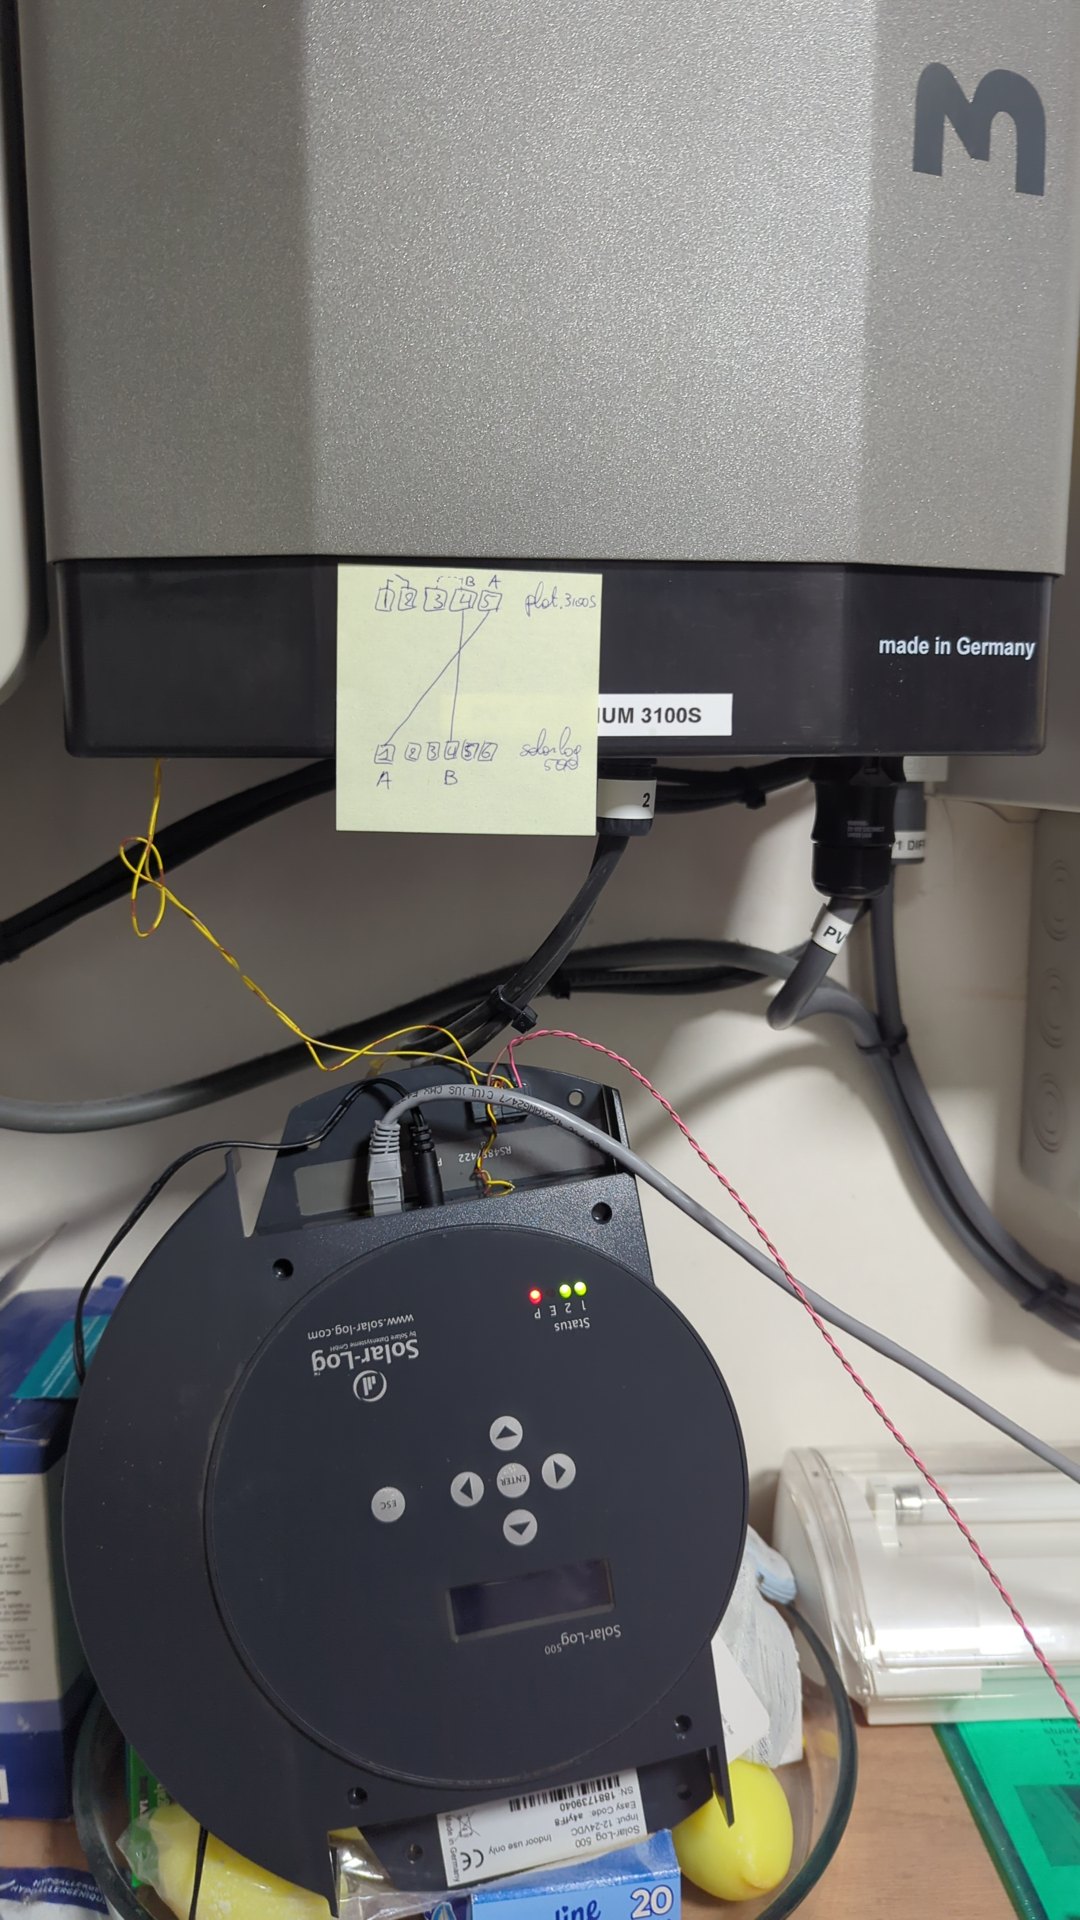
The Solar-Log 500 (bottom) mounted in the enclosure beneath the Platinum 3100S inverter, linked by the two-wire RS485 bus.
What is a Solar-Log?#
A Solar-Log
is a standalone PV data logger. You
wire it to your inverter over RS485, plug it into your network, and it polls
the inverter every few seconds, logs the yield, and serves the data up through
a web UI and a small HTTP API. The 500 is the mid-range model in the older
“classic” series (the 200/500/1000 share a family) — built around a Beck
IPC@CHIP embedded controller. It’s a single-purpose box: no Wi-Fi, one
Ethernet port, a green terminal block for the RS485 bus, and four LEDs on the
front.
My inverter is a Platinum 3100S (Platinum was formerly Diehl AKO). It’s a single-MPPT, roughly 3 kW string inverter with 2990 Wp of panels behind it. The only data path off it is RS485, so the Solar-Log sits between the inverter and the rest of the house.
The “invisible” device#
The first surprise was that I couldn’t find the thing on my network.
My usual first move with any new device is to sweep the LAN and match MAC
addresses to vendors by their OUI — the first three bytes of the MAC, which are
assigned to the manufacturer. Solar-Log is made by Solare Datensysteme, whose
OUI is AC:1D:DF. So I scanned the whole 192.168.1.0/24 subnet looking for
anything Solar-Log-branded. Nothing. I even broadened the sweep to the German
home-router ranges (192.168.178.0/24) and the link-local 169.254.0.0/16
range in case it had fallen back to a self-assigned address. Still nothing.
The device was plugged into switch port 24 and the switch — a TP-Link TL-SG1428PE — happily reported a 100 Mbps link up on that port, so something was physically alive. It just wasn’t answering to the name I expected it to.
The reason is a gem of industrial sourcing: the Solar-Log’s Ethernet module is
an HMS Industrial Networks part, so its MAC starts with 00:30:56 — HMS’s
OUI, not Solar-Log’s. Every vendor-aware scan in every tool was looking for
AC:1D:DF and sailing right past 00:30:56. The logger had been on DHCP at
192.168.1.146 the entire time, sitting under an unfamiliar vendor name with
no friendly hostname.
The way I finally pinned it down is worth remembering. I started a tcpdump
on the LAN in the background and had someone power-cycle the logger. On boot it
sent out a DHCP request and a gratuitous ARP for the APIPA address
169.254.90.40 — and 9040 are the last four digits of the serial number
printed on the device’s sticker (1831739040). The source MAC was
00:30:56:a3:74:26, which had been in my very first scan at .146. Loading
the web page at that IP returned Server: IPC@CHIP and pages full of the words
“Solar-Log” and “Wechselrichter” (German for inverter). That was it. The device
had been hiding in plain sight the whole time.
The lesson: OUI scanning is brilliant when the device uses its own manufacturer’s networking silicon, and useless when it doesn’t. Data loggers, industrial gateways, and cheap IoT gear routinely use third-party Ethernet modules, and their MACs belong to whoever made that chip. When a device won’t show up, fall back to the switch port and a packet capture — the link layer never lies.
Wiring the RS485 — and the polarity trap#
With the logger found, the next job was connecting it to the inverter. RS485 is a two-wire, differential serial bus — rugged, noise-tolerant, and the standard way inverters expose their data. The Platinum 3100S offers it on a pair of RJ45 jacks, but I left those alone and wired into the screw terminal block beside them instead. A screwed-down connection is more reliable for a permanent install than a click-in plug — and it keeps you well clear of the Solar-Log’s own RJ45, which is its LAN port, not an RS485 port.
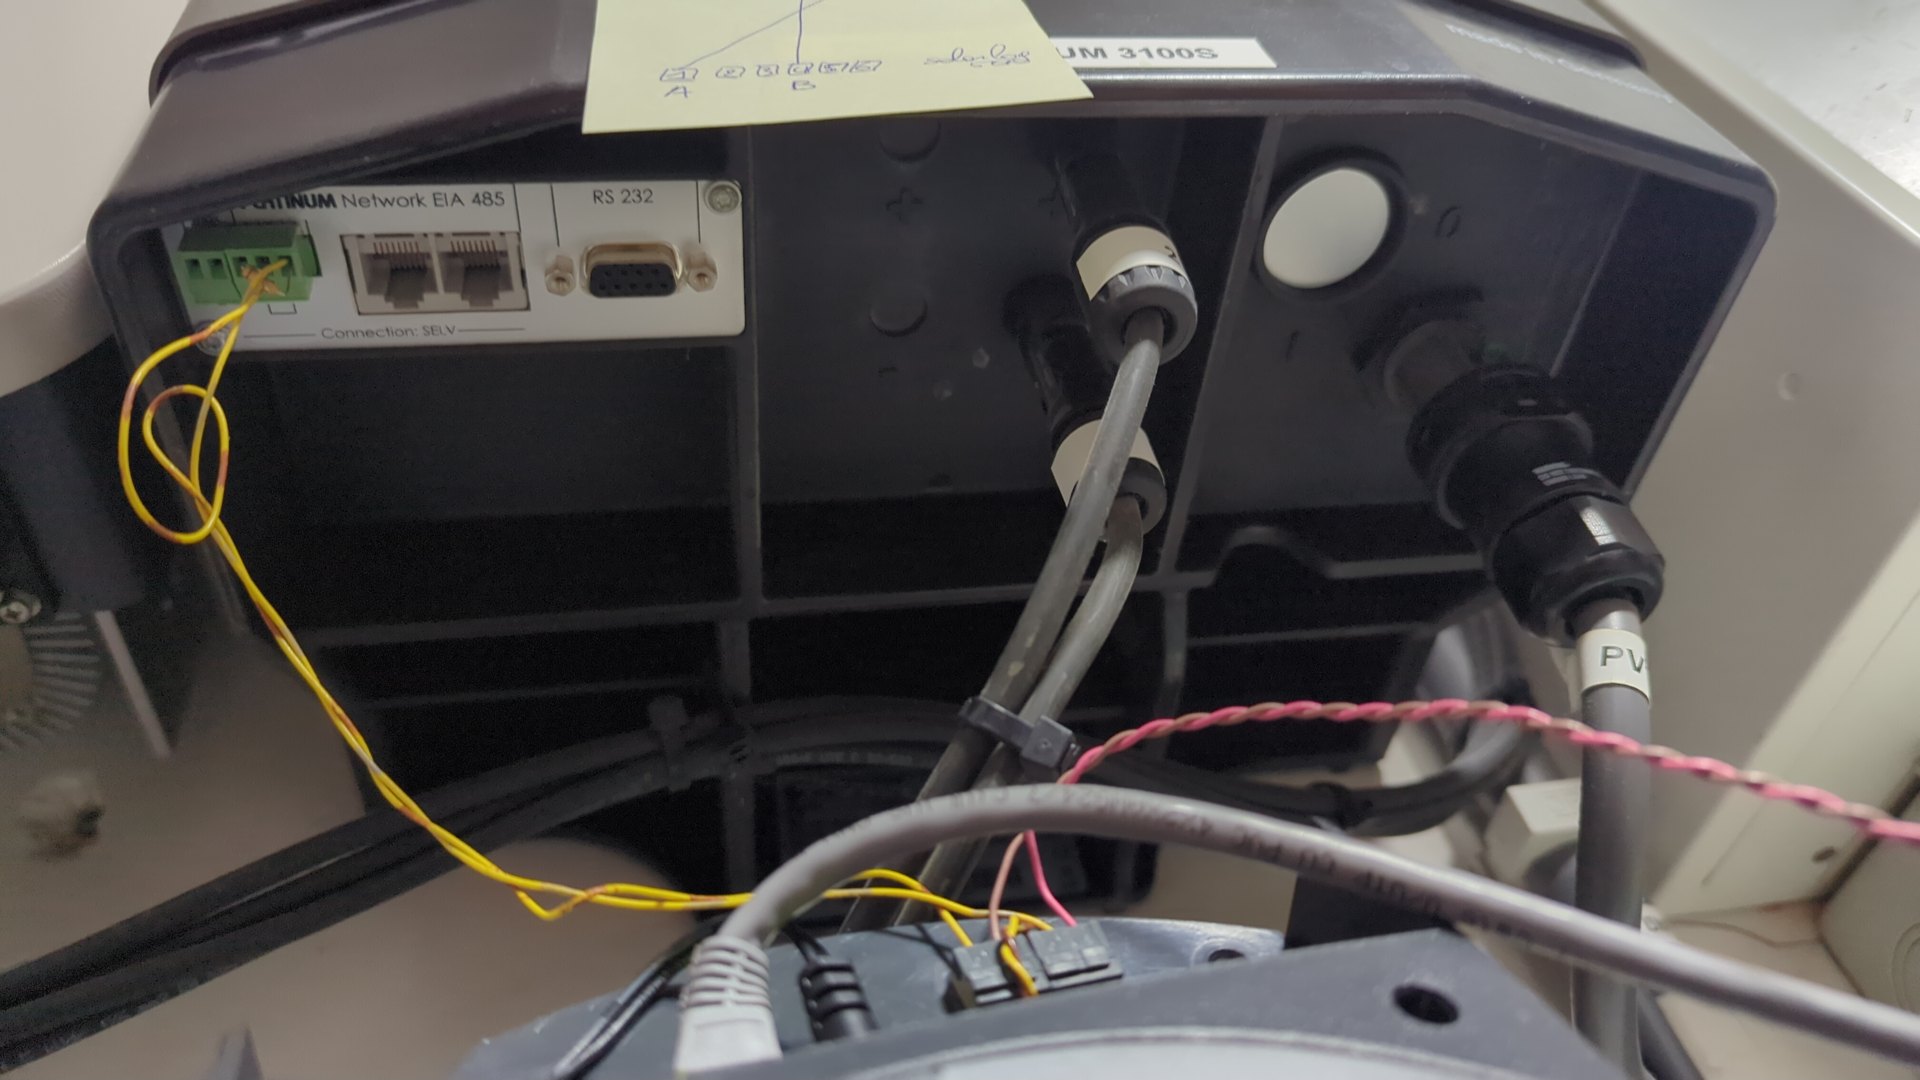
The Platinum 3100S connectivity panel. The RS485 bus is wired to the green screw terminal block — A on pin 4, B on pin 5 — rather than the RJ45 jacks next to it.
It’s just two wires end to end:
| Signal | Platinum 3100S screw terminal | Solar-Log 500 terminal |
|---|---|---|
| A | pin 4 | terminal 1 |
| B | pin 5 | terminal 4 |
Rather than the little wire-bridge termination the inverter ships with, I dropped a 120 Ω resistor across A and B at the inverter end. Same job, but a discrete resistor is something I can see and measure. On a short two-node bus like this termination is strictly optional — it just doesn’t hurt.
My first attempt gave no detection at all, and the reason was embarrassing: I’d reversed the polarity. RS485 is polarity-sensitive. On some buses a reversal sort-of works because the differential receivers are forgiving; on this one it was a hard failure — the Solar-Log polled and the inverter never answered. Swapping A and B fixed it immediately.
One warning worth shouting about, because it can cost you hardware:
- The inverter powers its RS485 interface from the DC side, which means the bus only lives while the panels are producing. At night the inverter is effectively asleep and won’t answer detection. If you sit down to configure the logger after sunset and detection silently fails, this is why — wait for daylight.
(And if you do reach for the RJ45 instead of the screw terminals: the Solar-Log’s RJ45 is its LAN port. Plugging the inverter’s RS485 into it puts bus voltages across an Ethernet PHY — a reliable way to kill the logger. Terminals only.)
The firmware — the actual blocker#
This was the part that ate the most time. The unit shipped on firmware 2.8.0-47, and on that version the Platinum 3100S simply would not be detected.
The modern, clean “Definition → Detection” workflow — and a reliable profile for Platinum inverters — only exists on the 3.x firmware line. On 2.8.0, the closest thing to an inverter-setup function is “Uitwisseling omvormer” (Dutch for “exchange inverter”), which is meant for swapping one like-for-like inverter for another. Trying to use it to add a new inverter just threw “number of inverters or MPP-Tracker is not identical” — a confusing error that really means “this is the wrong function entirely.”
So the firmware had to come up. The catch is that you can’t jump straight to 3.x — the upgrade is a strict, irreversible chain:
2.8.0-47 → 2.8.4 (≥ 2.8.3-53) → 3.6.0-99Each step is a stepping stone to the next; skip one and it refuses. Once you’re on 3.x there’s no going back to 2.8.x.
A few practical notes that would have saved me time:
- The old firmware files now need an owner-ID authorisation from Solar-Log to
download. The community has mirrored them — I used
stefan-bauer.net/solarlog— but the files are specific to the source version, so you have to pick exactly the right one for where you’re coming from. - The firmware upload page looks like it wants Internet Explorer, which puts people off, but I had no trouble with it on Firefox under Windows 11 — no compatibility mode needed. A current browser handled the upload fine.
- Back up the device’s configuration first, and budget patience. After each jump the logger spent hours reformatting its historical data in the background, during which the web UI was sluggish and the device felt half-alive. Let it finish.
Once it landed on 3.6.0, I enabled the RS485-B interface, ran detection,
and the 3100S showed up immediately. The rest of the configuration was
straightforward: 2990 Wp generator power, single MPP tracker, set the clock
(it had been stuck at 2000-01-01), and clear out the previous owner’s portal
and banner placeholders.
Reading the front panel#
The four LEDs on the front are the only onboard diagnostics, and once you know the language they tell you everything about whether the bus is healthy. This applies across the 200/500/1000 family:
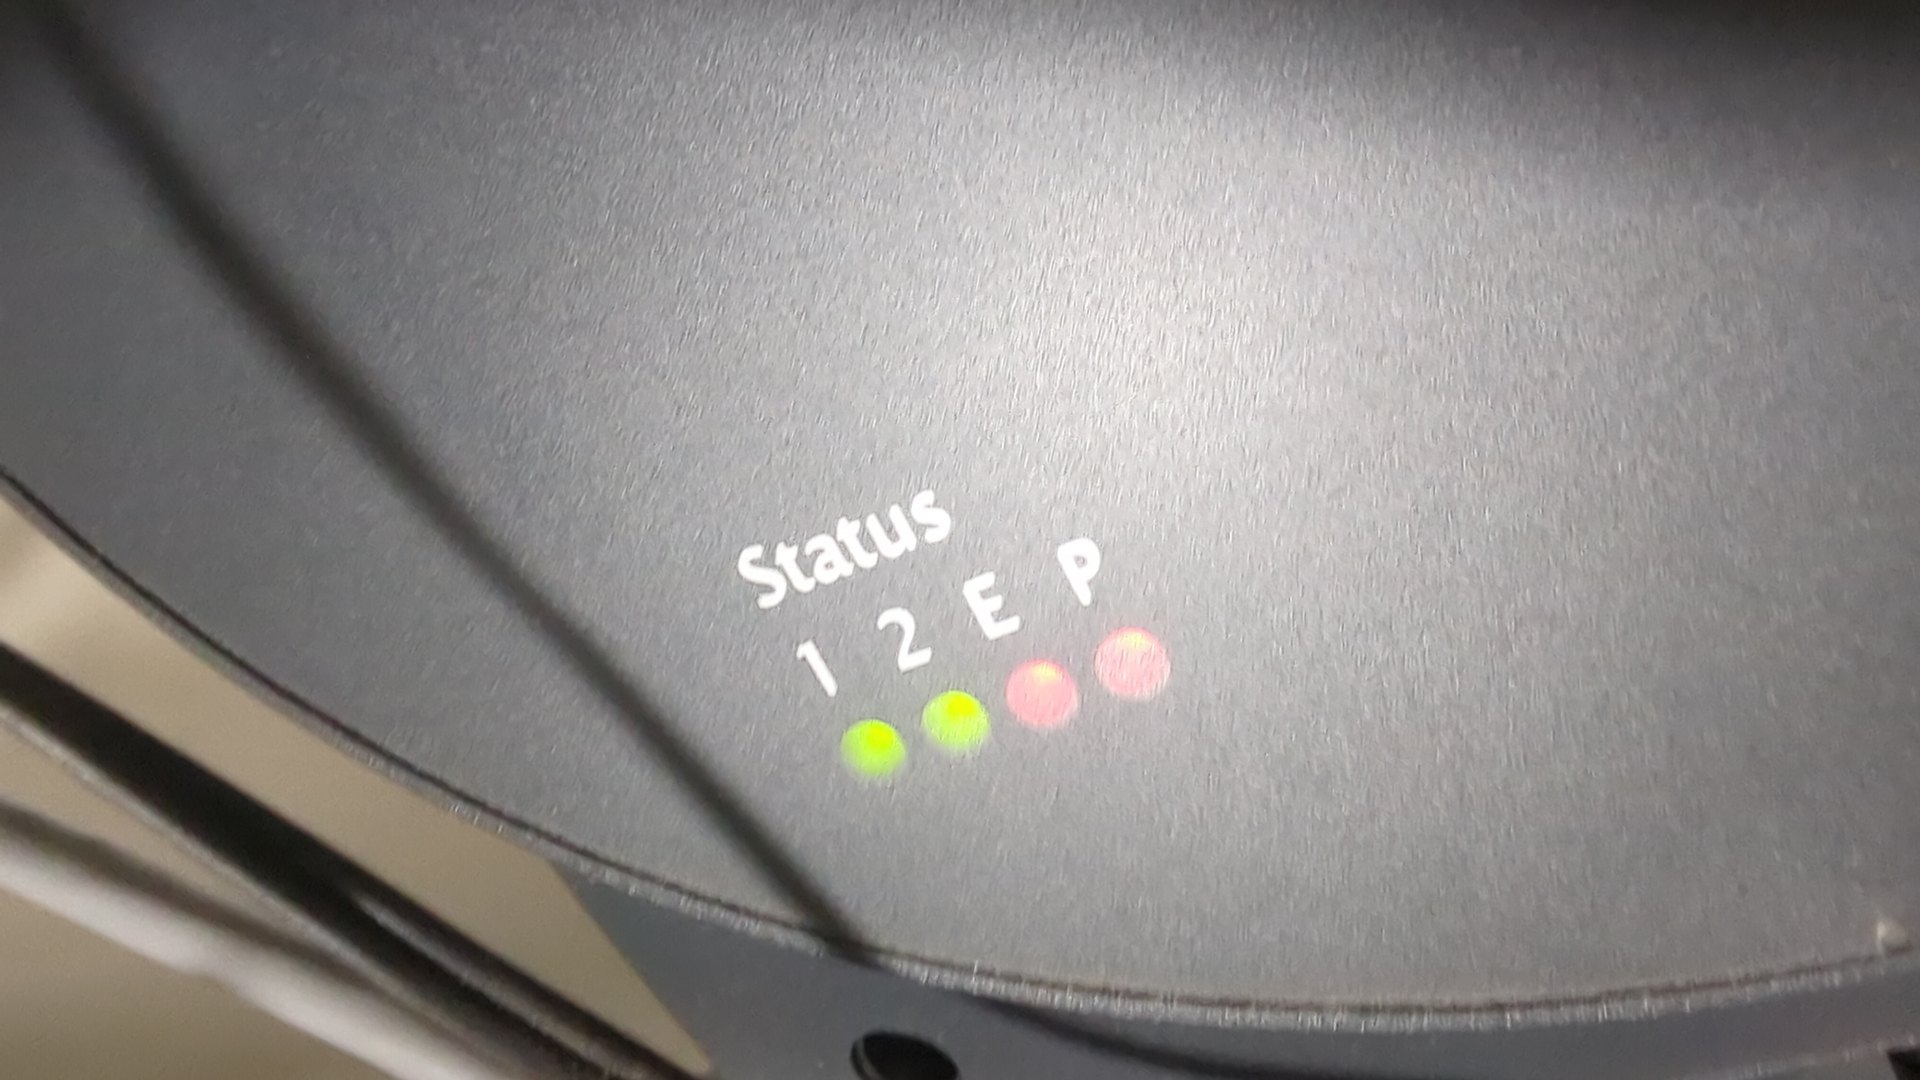
The Solar-Log’s four front-panel status LEDs — P, 1, 2, and E — which between them tell you whether the inverter bus is alive.
P— power (solid = OK)1/2— bus statusE— error (dark during normal operation)
The meaningful combinations:
| LEDs | Meaning |
|---|---|
1 + 2 solid, E off | Inverter online and talking |
1 solid, 2 off | Inverter offline — normal at night |
2 + E blinking ~1 Hz, with 1 solid | Harmless NTP / time-sync warning |
2 + E blinking ~1 Hz, with 1 off | Config or cable fault — check your RS485 |
That last distinction is the subtle one: the same two LEDs blinking can be
completely harmless (just set the clock and it goes away) or a real wiring
problem, and the only way to tell them apart is whether 1 is lit. The
2000-01-01 clock I mentioned produced exactly that harmless NTP blink until I
set the time.
Into Home Assistant#
With the logger producing sensible numbers on its own web UI, the final step
was getting it into Home Assistant. There’s a native Solar-Log integration —
Settings → Devices & Services → Add Integration → Solar-Log. Point it at
http://192.168.1.146 and leave “extended data” off: this is a classic
device that serves the /getjp endpoint, and the extended-data option is for
the newer meter-style logging that this hardware doesn’t do.
The integration creates a set of entities under
sensor.technieken_solarlog500_* (I named the inverter “technieken”, which is
why the prefix looks odd). The important ones:
..._power_ac— live AC output, in watts..._power_dc— DC power coming off the panels..._yield_day— energy produced today..._yield_total— lifetime energy counter..._installed_peak_power— configured array size
To wire it into the Energy Dashboard, under Solar production:
- Energy (the kWh counter):
..._yield_total - Power (the live wattage):
..._power_ac
One thing to know: the lifetime counter was reset when the logger was
reconfigured, so yield_total starts fresh from setup day. The history going
forward is correct; there’s just no pre-setup baseline. The consumption
sensors read zero, which is expected — there’s no S0 meter wired up, so the
Solar-Log only sees production, not consumption.
Verifying it was real took about thirty seconds. I pulled the live values from Home Assistant and compared them against what the inverter’s own display was showing at that instant:
| Sensor | Home Assistant | Note |
|---|---|---|
..._power_ac | 1071 W | live AC output |
..._power_dc | 1130 W | DC in — slightly higher than AC, the conversion loss |
..._yield_day | 14.918 kWh | matched the logger’s own /getjp reading |
..._installed_peak_power | 2990 W | matched the configured array size |
DC reading higher than AC is exactly what you want to see — the inverter can’t push 100% of the DC it harvests back out as AC, so a small gap is the conversion loss. If they’d been identical I’d have suspected one of the numbers was stale.
A debugging tip: the /getjp endpoint#
The Solar-Log serves a tiny JSON-over-HTTP API that’s invaluable when something
looks off and you want to see the raw numbers without the web UI. It’s a POST
to /getjp:
curl -s -X POST http://192.168.1.146/getjp \
  -H "Content-Type: application/json" --data '{"801":{"170":null}}'
The 801/170 codes request the live inverter block. The useful fields in
the response:
| Code | Meaning |
|---|---|
| 101 | Pac (AC power) |
| 102 | Pdc (DC power) |
| 103 | Uac (AC voltage) |
| 104 | Udc (DC voltage) |
| 105 | yield today (Wh) |
| 106 | yesterday · 107 month · 108 year · 109 total |
| 116 | installed peak power (Wp) |
Whenever the Home Assistant integration looked even slightly off, this was the
ground truth I checked against — if /getjp and HA agreed, the issue was on
the HA side; if they disagreed, it was the logger or the bus.
Lessons learned#
Three things stand out from this project.
Vendor scans lie when the silicon is borrowed. The Solar-Log’s HMS MAC kept it invisible to every OUI-based tool I threw at it. When a device won’t appear in a network scan, trust the switch port and a packet capture over the MAC vendor lookup — the link layer doesn’t care whose name is on the box.
RS485 polarity will get you once. The bus is otherwise forgiving, which makes the one thing it isn’t forgiving about — which wire is A and which is B — easy to dismiss. If detection fails silently, swap the pair before you touch anything else.
Old firmware is the real blocker, not the hardware. The device was electrically fine the whole time; it just couldn’t recognise the inverter until I walked it up the irreversible 2.8.0 → 2.8.4 → 3.6.0 ladder. Budget the afternoon for the firmware, not the wiring, and don’t start it late in the day — the inverter is asleep at night and you can’t test detection in the dark.
Resources#
- Solar-Log — manufacturer of the Solar-Log loggers
- Home Assistant — the native Solar-Log integration brings the data in
- Solar-Log firmware mirror (stefan-bauer.net) — community archive of the version-specific firmware files
- Turning a Cheap Yellow Display into a Home Assistant Control Panel — another device joining the same HA setup